Page Text
RAMP EDGE
cutting the braces that hold your templates
together and provide a surface for fastening
plywood sheets. Since the templates are not
parallel, each cross brace must be custom.
cut. In addition to cutting an arc on each 2x6"
brace that matches the corner radius, you
must make separate miter and bevel cuts to
compensate for the changing angles at
which the brace meets the templates.
To measure your brace lengths, hold the
brace up to the pre-marked spot on the tran-
sition and mark where it touches. The longest
point on your 2x6" brace is on top, so
measure above the mark on your tem-
plates. This compensates for the angles of
the templates. Use a framing square to set
the angles for miter and bevel cuts on both
ends of the brace. After you've made the
bevel and miter cuts, draw an eight-foot
radius arc on the 6" face, from front corner
to front corner (see figure 3). Screw your 2x6"
into something which will allow you to work
safely (remember to allow for blade
clearance). After you cut each brace so the
ends are flush with the templates, slide it bet-
ween the templates and nail it from the sides.
COPING AND ROLL-OUT DECKS
The roll-out decks rest on frames with extra
2x4's up front to compensate for the curve.
You may use 2x4" hanger joists to help you
get at those hard to reach angles and add
extra strength. The surface of your deck is
just a template laid flat along the coping.
Be sure to leave room for small pieces of
2x4" to control the protrusion of your cop
ing. These are put behind the coping on top
of the templates. A good idea is to have your
coping on hand to match up to the bowl as
you near completion. The best pipe to use
is a steel bar 3" O.D. (Outer Diameter). PVC
will work if you like a buffered coper type
grind. Be sure to put a screw into the coping
every foot or so through the curve.
PLYWOOD APPLICATION
You will need four layers of plywood for the
skating surface-a base of 1/2" ply, two in-
termediate layers of 14" ply and a final layer
of 4" masonite. Use the orange peel pat-
tern (see figure 4) to cover the first layer. If
you soak your plywood for a couple of hours,
it will flex a lot easier. You'll need to make
relief cuts every foot from side to side; a foot
long V with the opening gap measuring
about 4. These cuts might have to be
deepened, so cut them while the plywood
sits in place, checking as you go. If you're
connecting to an existing ramp, cut three to
four inches off the old ramp's riding surface.
This will make the transition between old and
new ramp less noticeable. Set your saw
blade depth guide to cut only through the
masonite and first layer of plywood. Nails
should be used to fasten the under surfaces.
Use #2 Sheetrock screws to secure the final
coat of masonite.
Quarter-inch plywood should be used for
the second and third layers. Cut it in the
flower petal pattern (see figure 5). This will
smooth out the first layer's seams. Overlap
the third layer on the seams from the second
layer. The masonite should be cut in the
orange peel pattern and, as I said, use #2
drywall screws to hold it down. You'll need
to measure the top layer again because all
Figure 4
First Layer
ORANGE PEEL PATTERN
Figure 5
FLOWER PETAL PATTERN
For Masonite & ¼" ply
BOWL MOVEMENT
by Don Fisher
It's said that history always repeats itself.
I believe this is happening now in skate
boarding. Early skateboard mags and photos
of old skateparks will attest to the fact that
the carve was once the most basic of man-
euvers. The carve was all but forgotten by
the masses with straight wall halfpipes and
mini-ramps. Now the cycle is returning to the
carve. Bowls are being laid out in cement
(Stone Edge in Florida, Skatepark of
Houston), or made out of wood with a
masonite skating surface and curved steel
coping bar. This month we'll give you the
lowdown on how to build your own bowl.
Be warned that this is no easy task. We're
giving you the basics, but before you start-
whacking, consult with a carpenter or some-
one who has already built a bowl. Draw
detailed plans, learn how to use a framing
square, and make sure you understand bevel
and miter cuts before you build. Otherwise,
you'll end up with more wood in the scrap
pile than in the frame of your kinked,
dangerous corner. Building a spherical form
out of wood is an achievement even for
veteran carpenters, so don't expect to be suc-
cessful unless you invest a lot of time, hard
work, money and patience. But believe me,
all that investing is worth it.
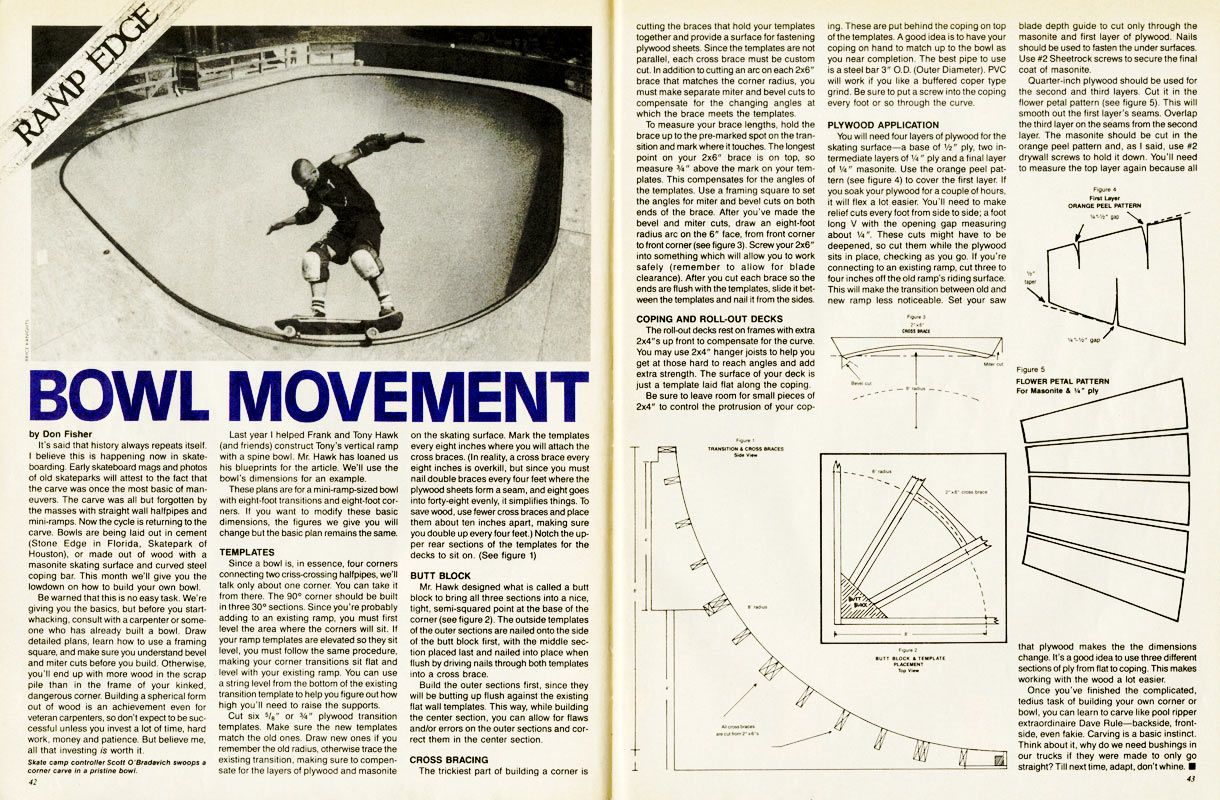
Skate camp controller Scott O'Bradavich swoops a
corner carve in a pristine bowl.
Last year I helped Frank and Tony Hawk
(and friends) construct Tony's vertical ramp
with a spine bowl. Mr. Hawk has loaned us
his blueprints for the article. We'll use the
bowl's dimensions for an example.
These plans are for a mini-ramp-sized bowl
with eight-foot transitions and eight-foot cor-
ners. If you want to modify these basic
dimensions, the figures we give you will
change but the basic plan remains the same.
TEMPLATES
Since a bowl is, in essence, four corners
connecting two criss-crossing halfpipes, we'll
talk only about one corner. You can take it
from there. The 90° corner should be built
in three 30° sections. Since you're probably
adding to an existing ramp, you must first
level the area where the corners will sit. If
your ramp templates are elevated so they sit
level, you must follow the same procedure,
making your corner transitions sit flat and
level with your existing ramp. You can use
a string level from the bottom of the existing
transition template to help you figure out how
high you'll need to raise the supports.
Cut six " or " plywood transition
templates. Make sure the new templates
match the old ones. Draw new ones if you
remember the old radius, otherwise trace the
existing transition, making sure to compen-
sate for the layers of plywood and masonite
on the skating surface. Mark the templates
every eight inches where you will attach the
cross braces. (In reality, a cross brace every
eight inches is overkill, but since you must
nail double braces every four feet where the
plywood sheets form a seam, and eight goes
into forty-eight evenly, it simplifies things. To
save wood, use fewer cross braces and place
them about ten inches apart, making sure
you double up every four feet.) Notch the up-
per rear sections of the templates for the
decks to sit on. (See figure 1)
BUTT BLOCK
Mr. Hawk designed what is called a butt
block to bring all three sections into a nice,
tight, semi-squared point at the base of the
corner (see figure 2). The outside templates
of the outer sections are nailed onto the side
of the butt block first, with the middle sec-
tion placed last and nailed into place when
flush by driving nails through both templates
into a cross brace.
Build the outer sections first, since they
will be butting up flush against the existing
flat wall templates. This way, while building.
the center section, you can allow for flaws
and/or errors on the outer sections and cor-
rect them in the center section.
CROSS BRACING
The trickiest part of building a corner is
TRANSITION & CROSS BRACES
Fique 2
BUTT BLOCK & TEMPLATE
PLACEMENT
Top View
that plywood makes the the dimensions
change. It's a good idea to use three different
sections of ply from flat to coping. This makes
working with the wood a lot easier.
Once you've finished the complicated,
tedius task of building your own corner or
bowl, you can learn to carve like pool ripper
extraordinaire Dave Rule-backside, front-
side, even fakie. Carving is a basic instinct.
Think about it, why do we need bushings in
our trucks if they were made to only go
straight? Till next time, adapt, don't whine.