Page Text
RAMPS
Framing
&
Accessories
SIDE VIEW
Fig. 2 Top View
Fig. 1
There's no doubt that ramps have become the prime vertical
terrain being skated today. Local contests are being held almost
every other weekend on halfpipes around the world. Backyard
sessioning has become mandatory for any skater who needs a
steady diet of wall riding to stay happy. Kids want a place to skate,
so they're building their own. Moms and dads are getting behind it
because it keeps their kids (and everybody else's around the house,
they soon find out), so consequently, more ramps are being built.
You might even conclude that ramps are one of the most frequently
constructed backyard structures of our day.
With more ramps being built these days we are, of course, seeing
more sophisticated building and carpentry techniques being used.
The better the ramp the better the skating. Also, harsher landings
and heavy bailing from high airs and plants mean more abuse to the
ramp structure. Accessories such as canyons and stairways have
brought us a long way from the days of just slapping a few boards
together, although that still works too.
In this chapter we'll discuss some techniques for getting you
started this Spring. As Winter's onslaught subsides many existing
ramps will be in need of structural repairs and perhaps a new layer
of plywood or masonite. Maybe cut a channel, some new coping.
additional vert, rollout decks, etc. There are a lot of ways you can
improve or repair a tired old halfpipe.
So You Want to Build a Skateboard Ramp?
First you want to think about finding your space. I've seen ramps
of every description built in backyards, fields, orchards, parking
lots, mountain sides and creek beds. First look at the obvious spots
like your own backyard or a tolerant friend's pad. Private property
with permission is best for obvious reasons. Putting up a quarter
pipe or lightweight structure is one thing but sweating out a killer
ramp only to have someone tell you to take it down is not happening.
Warehouses, garages and the like are good sites because they are
level, indoors and away from the elements (cops and neighbors).
Check with your city or town officials in regard to public lands or park
and recreation facilities that might be available.
Once you have settled on a location for your ramp your next
hurdle will be acquiring enough wood to build it, or at least get you
started. Ripping off wood or shopping at 'the midnight lumber
supply can get you busted and we've been hearing some harrowing
tales. The amount of lumber you'll need will probably constitute
grand theft in most lawbooks so watch out! Don't get stopped before
you've even started. Look around for woodpiles or scrap to be
thrown away. Ask neighbors if they have any to donate. Wood is
expensive if you have to buy it outright but it is plentiful enough that
you can find a good bargain if you shop around. Check the phone
listings for salvage yards that deal in used wood. Most of the time
they'll have all you need at a fraction of the cost for new wood. You
may have to pull a few nails but it's worth it.
Once you have found a site to build on it is important to make sure
it is close to level. Starting with a bottom framework that is level
makes everything else fall into place a little easier once you begin
building upwards. If you're building on an incline or on otherwise
shaky ground you'll want to sink 4"x4" posts at least 2' into the
ground (preferably in cement) and sticking up high enough at the
low end to run a level beam between them (Fig. 1). If the ground is
soft, build the framing on top of cement pier blocks placed at the
strategic comers (refer to Fig. 2). Posting also lifts the structure off
the ground, thereby keeping rot and insect damage in check for a
longer period.
Rehabilitation of Older Ramps
There is nothing like a new skin of plywood or masonite to put
some added zest into your sessions this season. But, if the structure
underneath is soft and giving, or even broken, a new layer of ply
may not be the only answer, you might need major structural
repairs. The addition of plywood doesn't necessarily make a ramp
stronger.
Using a flat crow bar, pry up the old layers (Fig. 3). Masonite is
hard to save after it has been nailed and skated but the plywood
should be salvageable for use elsewhere on the ramp as transition
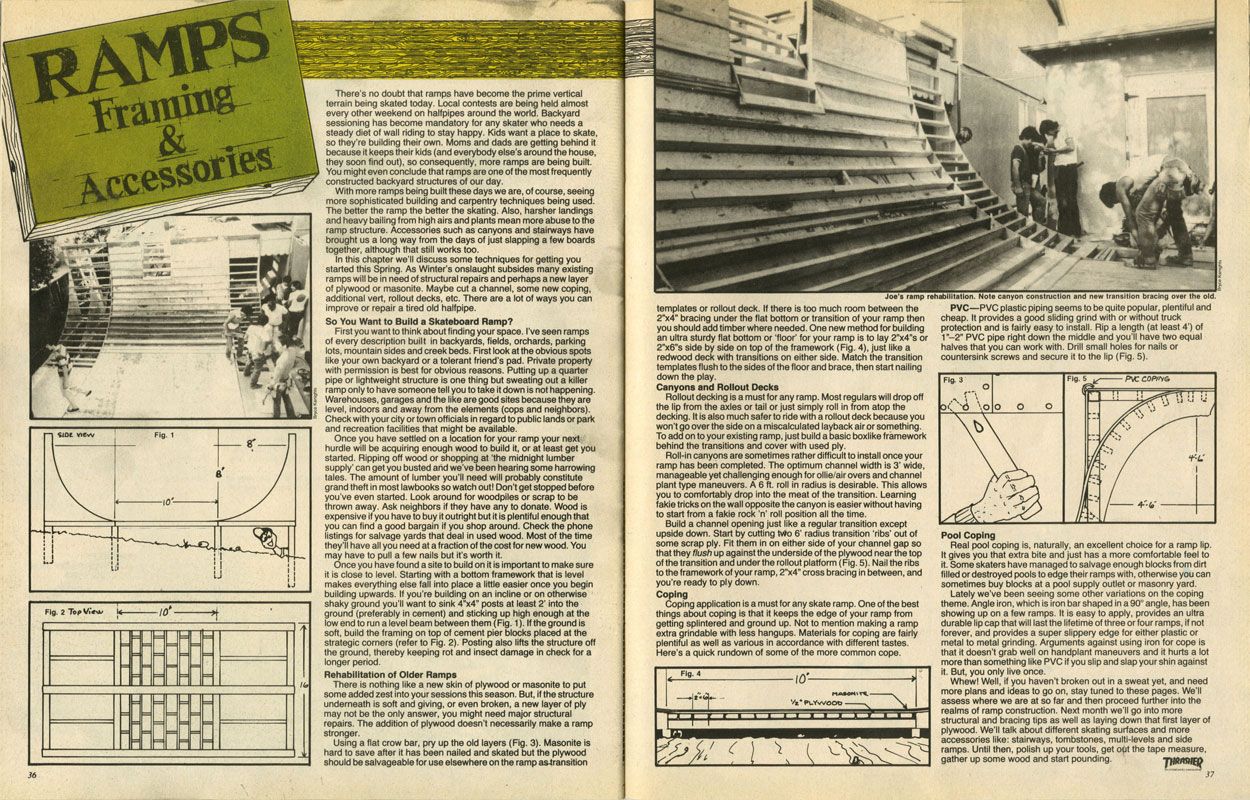
Joe's ramp rehabilitation. Note canyon construction and new transition bracing over the old.
PVC-PVC plastic piping seems to be quite popular, plentiful and
templates or rollout deck. If there is too much room between the
2'x4" bracing under the flat bottom or transition of your ramp then
you should add timber where needed. One new method for building
an ultra sturdy flat bottom or 'floor' for your ramp is to lay 2'x4's or
2'x6's side by side on top of the framework (Fig. 4), just like a
redwood deck with transitions on either side. Match the transition
templates flush to the sides of the floor and brace, then start nailing
down the play.
Canyons and Rollout Decks
Rollout decking is a must for any ramp. Most regulars will drop off
the lip from the axles or tail or just simply roll in from atop the
decking. It is also much safer to ride with a rollout deck because you
won't go over the side on a miscalculated layback air or something.
To add on to your existing ramp, just build a basic boxlike framework
behind the transitions and cover with used ply.
Roll-in canyons are sometimes rather difficult to install once your
ramp has been completed. The optimum channel width is 3' wide,
manageable yet challenging enough for ollie/air overs and channel
plant type maneuvers. A 6 ft. roll in radius is desirable. This allows.
you to comfortably drop into the meat of the transition. Learning
fakie tricks on the wall opposite the canyon is easier without having
to start from a fakie rock 'n' roll position all the time.
Build a channel opening just like a regular transition except
upside down. Start by cutting two 6' radius transition 'ribs' out of
some scrap ply. Fit them in on either side of your channel gap so
that they flush up against the underside of the plywood near the top
of the transition and under the rollout platform (Fig. 5). Nail the ribs
to the framework of your ramp, 2"x4" cross bracing in between, and
you're ready to ply down.
Coping
Coping application is a must for any skate ramp. One of the best
things about coping is that it keeps the edge of your ramp from
getting splintered and ground up. Not to mention making a ramp
extra grindable with less hangups. Materials for coping are fairly
plentiful as well as various in accordance with different tastes.
Here's a quick rundown of some of the more common cope.
Fig. 4
10-
MASONITE
**PLYWOOD
cheap. It provides a good sliding grind with or without truck
protection and is fairly easy to install. Rip a length (at least 4') of
1-2" PVC pipe right down the middle and you'll have two equal
halves that you can work with. Drill small holes for nails or
countersink screws and secure it to the lip (Fig. 5).
Fig. 31
°
00
о
D
Pool Coping
PVC COPING
46
46°
Real pool coping is, naturally, an excellent choice for a ramp lip.
It gives you that extra bite and just has a more comfortable feel to
it. Some skaters have managed to salvage enough blocks from dirt
filled or destroyed pools to edge their ramps with, otherwise you can
sometimes buy blocks at a pool supply outlet or masonry yard.
Lately we've been seeing some other variations on the coping
theme. Angle iron, which is iron bar shaped in a 90° angle, has been
showing up on a few ramps. It is easy to apply, provides an ultra
durable lip cap that will last the lifetime of three or four ramps, if not
forever, and provides a super slippery edge for either plastic or
metal to metal grinding. Arguments against using iron for cope is
that it doesn't grab well on handplant maneuvers and it hurts a lot
more than something like PVC if you slip and slap your shin against
it. But, you only live once.
Whew! Well, if you haven't broken out in a sweat yet, and need
more plans and ideas to go on, stay tuned to these pages. We'll
assess where we are at so far and then proceed further into the
realms of ramp construction. Next month we'll go into more
structural and bracing tips as well as laying down that first layer of
plywood. We'll talk about different skating surfaces and more
accessories like: stairways, tombstones, multi-levels and side
ramps. Until then, polish up your tools, get out the tape measure,
gather up some wood and start pounding.
THRASHER
37