Page Text
RAMPAG
Adding corners to wooden
ramps is something that most
backyard carpenters avoid
because they think it's too dif-
ficult. Actually, it's not that big of
a deal. I'll describe how to make a
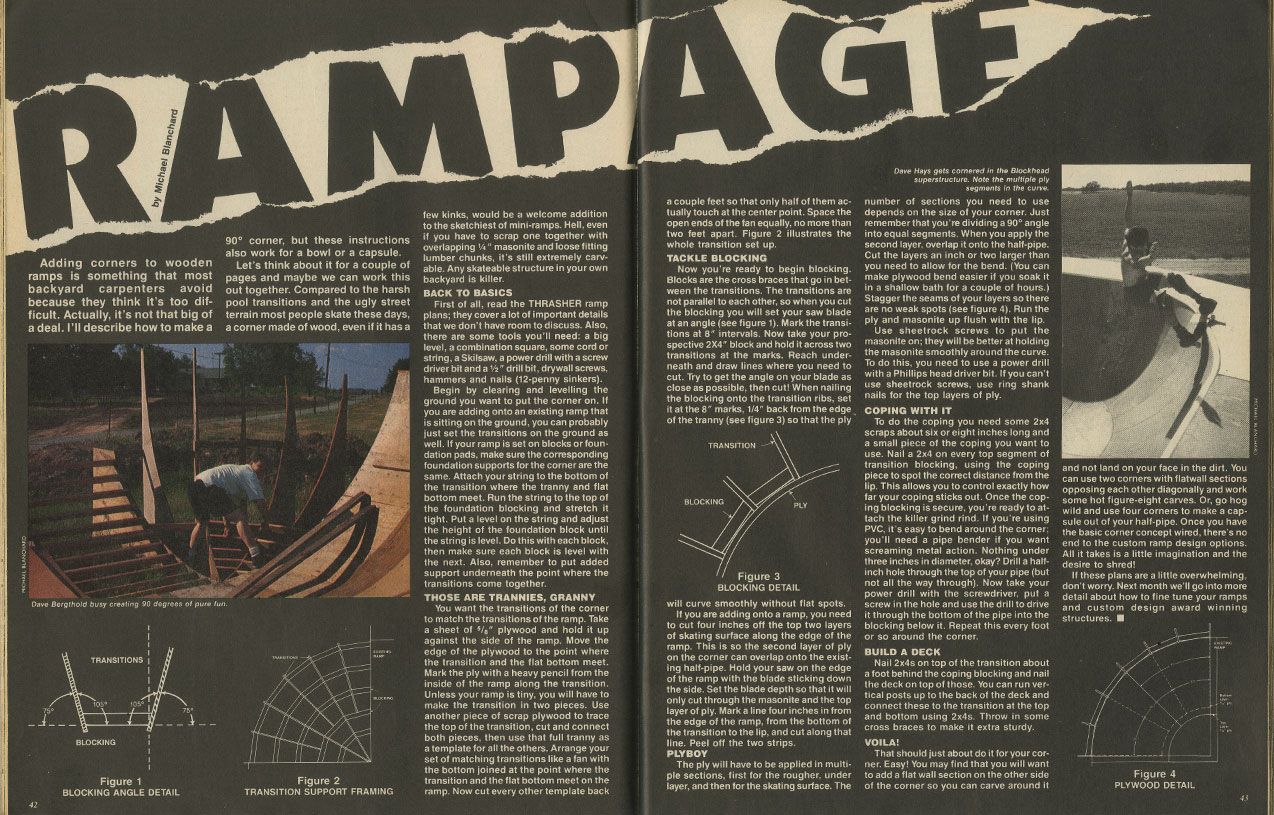
Dave Bergthold busy creating 90 degrees of pure fun.
TRANSITIONS
BLOCKING
Figure 1
BLOCKING ANGLE DETAIL
90° corner, but these instructions
also work for a bowl or a capsule.
Let's think about it for a couple of
pages and maybe we can work this
out together. Compared to the harsh
pool transitions and the ugly street
terrain most people skate these days,
a corner made of wood, even if it has a
Figure 2
TRANSITION SUPPORT FRAMING
few kinks, would be a welcome addition
to the sketchiest of mini-ramps. Hell, even
if you have to scrap one together with
overlapping 4" masonite and loose fitting
lumber chunks, it's still extremely carv-
able. Any skateable structure in your own
backyard is killer.
BACK TO BASICS
First of all, read the THRASHER ramp
plans; they cover a lot of important details
that we don't have room to discuss. Also,
there are some tools you'll need: a big
level, a combination square, some cord or
string, a Skilsaw, a power drill with a screw
driver bit and a ½" drill bit, drywall screws,
hammers and nails (12-penny sinkers).
Begin by clearing and levelling the
ground you want to put the corner on. If
you are adding onto an existing ramp that
is sitting on the ground, you can probably
just set the transitions on the ground as
well. If your ramp is set on blocks or foun-
dation pads, make sure the corresponding
foundation supports for the corner are the
same. Attach your string to the bottom of
the transition where the tranny and flat
bottom meet. Run the string to the top of
the foundation blocking and stretch it
tight. Put a level on the string and adjust
the height of the foundation block until
the string is level. Do this with each block,
then make sure each block is level with
the next. Also, remember to put added
support underneath the point where the
transitions come together.
THOSE ARE TRANNIES, GRANNY
You want the transitions of the corner
to match the transitions of the ramp. Take
a sheet of " plywood and hold it up
against the side of the ramp. Move the
edge of the plywood to the point where
the transition and the flat bottom meet.
Mark the ply with a heavy pencil from the
inside of the ramp along the transition.
Unless your ramp is tiny, you will have to
make the transition in two pieces. Use
another piece of scrap plywood to trace
the top of the transition, cut and connect
both pieces, then use that full tranny as
a template for all the others. Arrange your
set of matching transitions like a fan with
the bottom joined at the point where the
transition and the flat bottom meet on the
ramp. Now cut every other template back
a couple feet so that only half of them ac-
tually touch at the center point. Space the
open ends of the fan equally, no more than
two feet apart. Figure 2 illustrates the
whole transition set up.
TACKLE BLOCKING
Now you're ready to begin blocking.
Blocks are the cross braces that go in bet-
ween the transitions. The transitions are
not parallel to each other, so when you cut
the blocking you will set your saw blade
at an angle (see figure 1). Mark the transi-
tions at 8" intervals. Now take your pro-
spective 2X4" block and hold it across two
transitions at the marks. Reach under-
neath and draw lines where you need to
cut. Try to get the angle on your blade as
close as possible, then cut! When nailing
the blocking onto the transition ribs, set
it at the 8" marks, 1/4" back from the edge,
of the tranny (see figure 3) so that the ply
TRANSITION
BLOCKING
PLY
Figure 3
BLOCKING DETAIL
will curve smoothly without flat spots.
If you are adding onto a ramp, you need
to cut four inches off the top two layers
of skating surface along the edge of the
ramp. This is so the second layer of ply
on the corner can overlap onto the exist-
ing half-pipe. Hold your saw on the edge
of the ramp with the blade sticking down
the side. Set the blade depth so that it will
only cut through the masonite and the top
layer of ply. Mark a line four inches in from
the edge of the ramp, from the bottom of
the transition to the lip, and cut along that
line. Peel off the two strips.
PLYBOY
The ply will have to be applied in multi-
ple sections, first for the rougher, under
layer, and then for the skating surface. The
Dave Hays gets cornered in the Blockhead
superstructure. Note the multiple ply
segments in the curve.
number of sections you need to use
depends on the size of your corner. Just
remember that you're dividing a 90° angle
into equal segments. When you apply the
second layer, overlap it onto the half-pipe.
Cut the layers an inch or two larger than
you need to allow for the bend. (You can
make plywood bend easier if you soak it
in a shallow bath for a couple of hours.)
Stagger the seams of your layers so there
are no weak spots (see figure 4). Run the
ply and masonite up flush with the lip..
Use sheetrock screws to put the
masonite on; they will be better at holding
the masonite smoothly around the curve.
To do this, you need to use a power drill
with a Phillips head driver bit. If you can't
use sheetrock screws, use ring shank
nails for the top layers of ply.
COPING WITH IT
To do the coping you need some 2x4
scraps about six or eight inches long and
a small piece of the coping you want to
use. Nail a 2x4 on every top segment of
transition blocking, using the coping
piece to spot the correct distance from the
lip. This allows you to control exactly how
far your coping sticks out. Once the cop-
ing blocking is secure, you're ready to at-
tach the killer grind rind. If you're using
PVC, it's easy to bend around the corner;
you'll need a pipe bender if you want
screaming metal action. Nothing under
three inches in diameter, okay? Drill a half-
inch hole through the top of your pipe (but
not all the way through). Now take your
power drill with the screwdriver, put a
screw in the hole and use the drill to drive
it through the bottom of the pipe into the
blocking below it. Repeat this every foot
or so around the corner.
BUILD A DECK
Nail 2x4s on top of the transition about
a foot behind the coping blocking and nail
the deck on top of those. You can run ver-
tical posts up to the back of the deck and
connect these to the transition at the top
and bottom using 2x4s. Throw in some
cross braces to make it extra sturdy.
VOILA!
That should just about do it for your cor-
ner. Easy! You may find that you will want
to add a flat wall section on the other side
of the corner so you can carve around it
and not land on your face in the dirt. You
can use two corners with flatwall sections
opposing each other diagonally and work
some hot figure-eight carves. Or, go hog.
wild and use four corners to make a cap-
sule out of your half-pipe. Once you have
the basic corner concept wired, there's no
end to the custom ramp design options.
All it takes is a little imagination and the
desire to shred!
If these plans are a little overwhelming.
don't worry. Next month we'll go into more
detail about how to fine tune your ramps
and custom design award winning.
structures.
Figure 4
PLYWOOD DETAIL