Page Text
RAMPS
Accessories
This section is devoted to the increasing numbers of skaters build-
ing plywood structures for the sole purpose of experiencing one of
skateboarding's most thrilling aspects: Riding on the inclined or ver-
tical plane. Wooden simulation of pool transitions in the form of a
ramp has been progressing rapidly in the past year.
RAMP BUILDERS
THRASHER now has available a "ramp rag" to help you construct
Ne ultimate skating ramp. This little 'zine is packed with plans,
diagrams, materials lists and photos, everything we've ever printed
concerning Ramp Construction, and a lot more. Send $3.00 to
cover pastage and handling to: THRASHER
Ramps, P.O. Box 24592,
San Francisco, CA 94124.
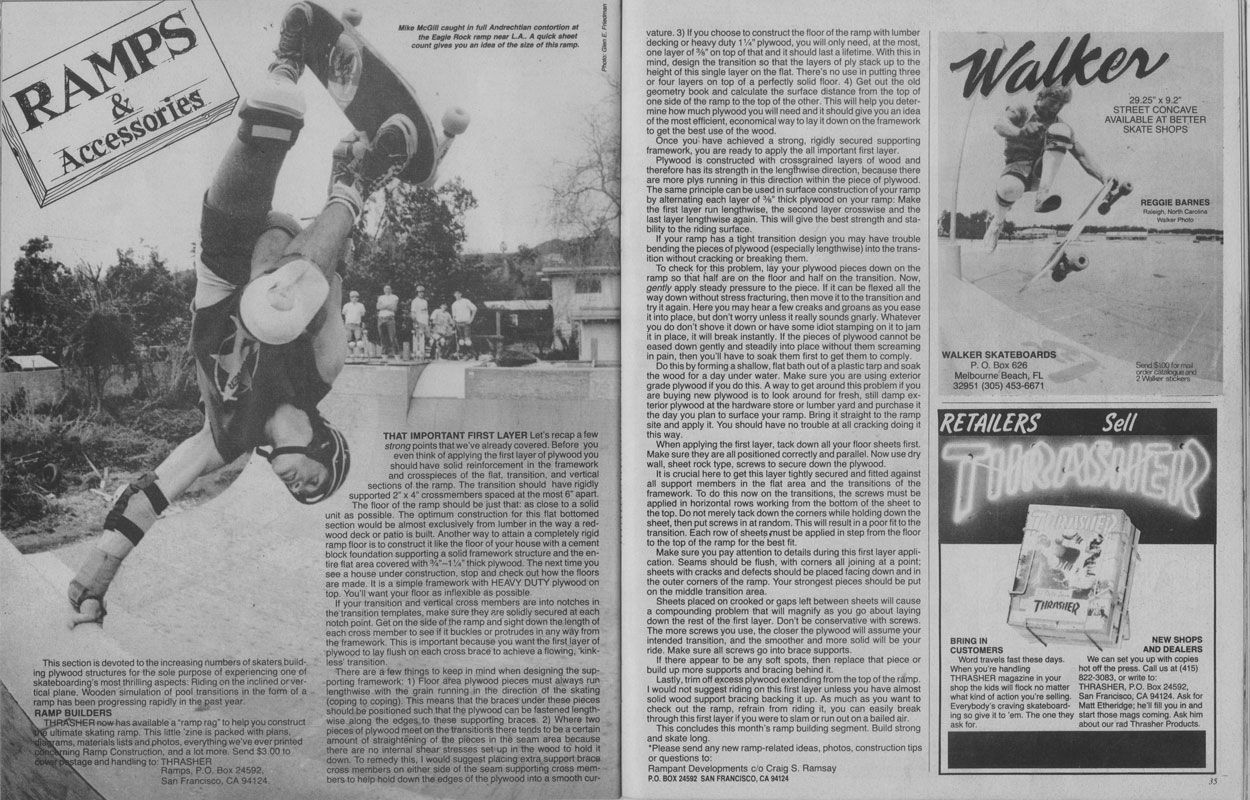
Mike McGill caught in full Andrechtian contortion at
the Eagle Rock ramp near L.A. A quick sheet
count gives you an idea of the size of this ramp.
THAT IMPORTANT FIRST LAYER Let's recap a few
strong points that we've already covered. Before you
even think of applying the first layer of plywood you
should have solid reinforcement in the framework
and crosspieces of the flat, transition, and vertical
sections of the ramp. The transition should have rigidly
supported 2" x 4" crossmembers spaced at the most 6" apart.
The floor of the ramp should be just that: as close to a solid
unit as possible. The optimum construction for this flat bottomed
section would be almost exclusively from lumber in the way a red-
wood deck or patio is built. Another way to attain a completely rigid
ramp floor is to construct it like the floor of your house with a cement
block foundation supporting a solid framework structure and the en-
tire flat area covered with %4"-14" thick plywood. The next time you
see a house under construction, stop and check out how the floors.
are made. It is a simple framework with HEAVY DUTY plywood on
top. You'll want your floor as inflexible as possible.
If your transition and vertical cross members are into notches in
the transition templates, make sure they are solidly secured at each
notch point. Get on the side of the ramp and sight down the length of
each cross member to see if it buckles or protrudes in any way from
the framework. This is important because you want the first layer of
plywood to lay flush on each cross brace to achieve a flowing, kink-
less' transition.
There are a few things to keep in mind when designing the sup
porting framework: 1) Floor area plywood pieces must always run
lengthwise with the grain running in the direction of the skating
(coping to coping). This means that the braces under these pieces
should be positioned such that the plywood can be fastened length-
wise along the edges to these supporting braces. 2) Where two
pieces of plywood meet on the transitions there tends to be a certain
amount of straightening of the pieces in the seam area because
there are no internal shear stresses set up in the wood to hold it
down. To remedy this, I would suggest placing extra support brace
cross members on either side of the seam supporting cross mem-
bers to help hold down the edges of the plywood into a smooth cur
vature. 3) If you choose to construct the floor of the ramp with lumber
decking or heavy duty 1/4" plywood, you will only need, at the most,
one layer of % on top of that and it should last a lifetime. With this in
mind, design the transition so that the layers of ply stack up to the
height of this single layer on the flat. There's no use in putting three
or four layers on top of a perfectly solid floor. 4) Get out the old
geometry book and calculate the surface distance from the top of
one side of the ramp to the top of the other. This will help you deter-
mine how much plywood you will need and it should give you an idea
of the most efficient, economical way to lay it down on the framework
to get the best use of the wood.
Once you have achieved a strong, rigidly secured supporting
framework, you are ready to apply the all important first layer.
Plywood is constructed with crossgrained layers of wood and
therefore has its strength in the lengthwise direction, because there
are more plys running in this direction within the piece of plywood.
The same principle can be used in surface construction of your ramp
by alternating each layer of % thick plywood on your ramp: Make
the first layer run lengthwise, the second layer crosswise and the
last layer lengthwise again. This will give the best strength and sta-
bility to the riding surface.
If your ramp has a tight transition design you may have trouble
bending the pieces of plywood (especially lengthwise) into the trans-
ition without cracking or breaking them.
To check for this problem, lay your plywood pieces down on the
ramp so that half are on the floor and half on the transition. Now,
gently apply steady pressure to the piece. If it can be flexed all the
way down without stress fracturing, then move it to the transition and
try it again. Here you may hear a few creaks and groans as you ease
it into place, but don't worry unless it really sounds gnarly. Whatever
you do don't shove it down or have some idiot stamping on it to jam
it in place, it will break instantly. If the pieces of plywood cannot be
eased down gently and steadily into place without them screaming
in pain, then you'll have to soak them first to get them to comply.
Do this by forming a shallow, flat bath out of a plastic tarp and soak
the wood for a day under water. Make sure you are using exterior
grade plywood if you do this. A way to get around this problem if you
are buying new plywood is to look around for fresh, still damp ex-
terior plywood at the hardware store or lumber yard and purchase it
the day you plan to surface your ramp. Bring it straight to the ramp
site and apply it. You should have no trouble at all cracking doing it
this way.
When applying the first layer, tack down all your floor sheets first.
Make sure they are all positioned correctly and parallel. Now use dry
wall, sheet rock type, screws to secure down the plywood.
It is crucial here to get this layer tightly secured and fitted against
all support members in the flat area and the transitions of the
framework. To do this now on the transitions, the screws must be
applied in horizontal rows working from the bottom of the sheet to
the top. Do not merely tack down the corners while holding down the
sheet, then put screws in at random. This will result in a poor fit to the
transition. Each row of sheets must be applied in step from the floor
to the top of the ramp for the best fit.
Make sure you pay attention to details during this first layer appli-
cation. Seams should be flush, with corners all joining at a point;
sheets with cracks and defects should be placed facing down and in
the outer corners of the ramp. Your strongest pieces should be put
on the middle transition area.
Sheets placed on crooked or gaps left between sheets will cause
a compounding problem that will magnify as you go about laying
down the rest of the first layer. Don't be conservative with screws.
The more screws you use, the closer the plywood will assume your
intended transition, and the smoother and more solid will be your
ride. Make sure all screws go into brace supports.
If there appear to be any soft spots, then replace that piece or
build up more supports and bracing behind it.
Lastly, trim off excess plywood extending from the top of the ramp.
I would not suggest riding on this first layer unless you have almost
solid wood support bracing backing it up. As much as you want to
check out the ramp, refrain from riding it, you can easily break
through this first layer if you were to slam or run out on a bailed air.
This concludes this month's ramp building segment. Build strong
and skate long.
*Please send any new ramp-related ideas, photos, construction tips
or questions to:
Rampant Developments c/o Craig S. Ramsay
P.O. BOX 24592 SAN FRANCISCO, CA 94124
Walker
WALKER SKATEBOARDS
P. O. Box 626
Melbourne Beach, FL
32951 (305) 453-6671
RETAILERS
29.25" x 9.2"
STREET CONCAVE
AVAILABLE AT BETTER
SKATE SHOPS
Sell
REGGIE BARNES
Raleigh, North Carolina
Walker Photo
Send $100 for mal
order catalogue and
2 Walker stickers
THRASHER
BRING IN
CUSTOMERS
THRASHER
Word travels fast these days.
When you're handling
THRASHER magazine in your
shop the kids will flock no matter
what kind of action you're selling.
Everybody's craving skateboard-
ing so give it to 'em. The one they
ask for.
NEW SHOPS
AND DEALERS
We can set you up with copies
hot off the press. Call us at (415)
822-3083, or write to:
THRASHER, P.O. Box 24592,
San Francisco, CA 94124. Ask for
Matt Etheridge; he'll fill you in and
start those mags coming. Ask him
about our rad Thrasher Products.