Page Text
RAMP
BUILDING
Basic construction techniques and
materials to assist you in building your
own skateboard ramp.
Last month we featured some hot ramp action on some finely constructed
skateboard ramps. This month we are presenting you with some tips on
designing and constructing your very own backyard skate structure. If you are
determined to build a skate ramp it's not really that hard. I have seen ramps
thrown together in one day that have lasted for months of heavy sessioning.
But you shouldn't rush into it, a safe and sturdy ramp takes a few days to plan
out and usually a solid wookend to build unless you are already an accom-
plished carpenter. It is best to start out building it right from the beginning. %
inch off at one end may mean several inches out of whack at the other
Several important steps should be taken even
ven before construction of
your ramp begins Round up your skate crew and without getting too technical
I will discuss some important stages in pre-planning your ramp. First off you
must find a site to build on. This is not only important fr
t from a legal point of
view (yes, some cities do have ordinances and hoight restrictions on backyard
construction-check). It may also determine the type of ramp you will be
building. You won't want to use heavy timbers such as 4x4's if you are going
to be moving the ramp a couple of weeks after you've built it, ideally you will
want to build on a fairly large flat coment area such as a patio or parking lot.
but a relatively level dirt or grass area will work fine.
Your second area of pre-planning should be obtaining wood and other
building materials that you will need. Unless you have 20-30 sheets of plywood
lying around or a large stock of 2x 4's you will probably end up spending
between $100-$200 on wood alone. Plywood isn't cheap and 2x4s aren't
just lying around, but there are ways of obtaining some free wood. First check
your own backyard woodpile for boards and ask friends and neighbors if
they have any. Also, hang around the local construction site and beg for cut-
off ands and various scraps, every little bit helps.
Other planning decisions might include the transition radius from flat to
vert I've t
found I that an 8 or 9 foof radius is perfect for a fluid yet thrustable
transition. You may also want to consider a flat bottom between walls Flat
bottom gives you more speed and more set up time from wall to wall. From
10-15 feet of flat is recommended for an unreal ramp. There are other con-
siderations such as width (the wider the better), coping and roll out decks,
but these will come later, right now your main concern is getting the basic
structure put together.
[1] BOTTOM FRAMEWORK
Since this is where your strength
and sturdiness begins 4x4's are
recommended here but 2x4's will
work Lay down your 4x4's in a
rectangular box long enough for
nes and flat bottom
your
transitions and t
(8 x 27" for a ramp with 10' flat
bottom and two 8 radius transi
tions). Brace with 2x4's spaced 6
inches apart under the flat section
and about a foot apart under the
transition areas. Place the 2x4s in
the frame with the 2" side facing
up and flush with the top of the
4x4's The 2x4's will also act as
something to connect the plywood
to flat bottom section. (SEE FIG. 1)
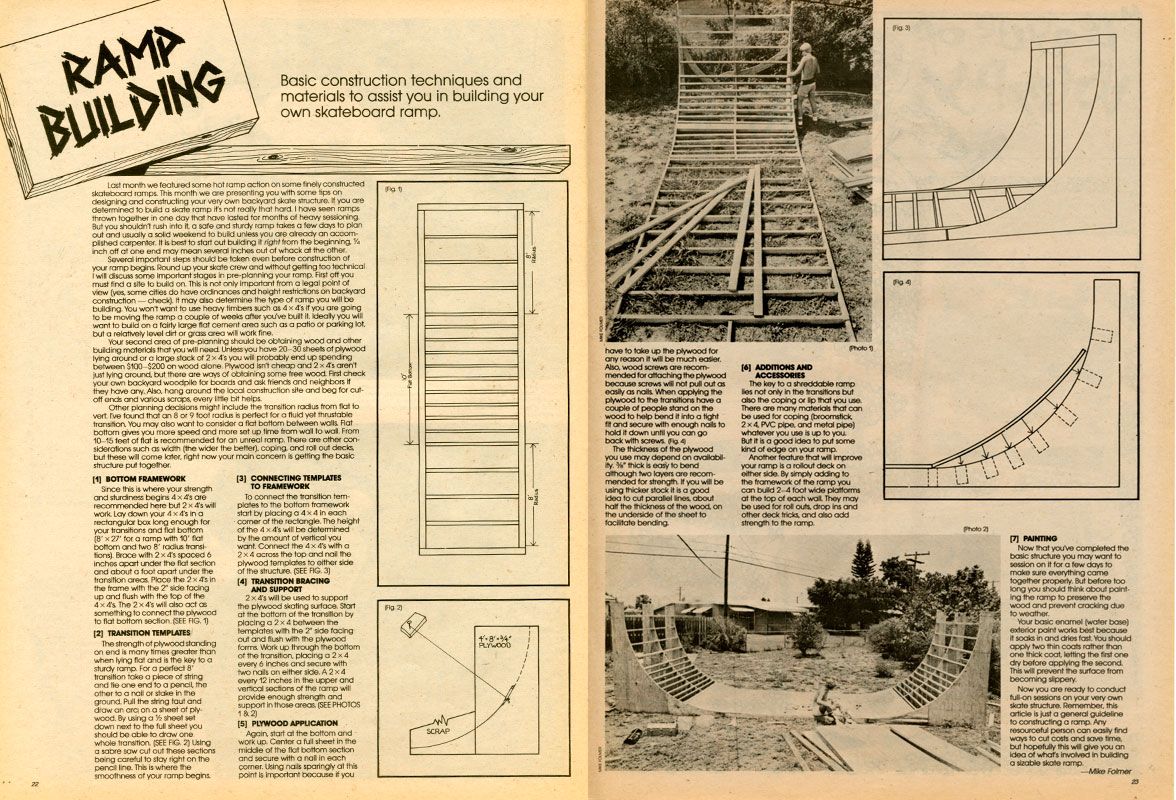
[2] TRANSITION TEMPLATES
The strength of plywood standing
on end is many times greater than
when lying flat and is the key to a
sturdy ramp. For a perfect 8
transition take a piece of string
and the one end to a pencil, the
other to a nail or stake in the
ground. Pull the string faut and
draw an arc on a sheet of ply
wood. By using a sheet set
down next to the full sheet you
should be able to draw one
whole transition (SEE FIG. 2) Using
a sabre saw cut out these sections
being careful to stay right on the
pencil line. This is where the
smoothness of your ramp begins
[3] CONNECTING TEMPLATES
TO FRAMEWORK
To connect the transition tem-
plates to the bottom framework
start by placing a 4x4 in each
comer of the rectangle. The height
of the 4x4's will be determined
by the amount of vertical you
want. Connect the 4x 4's with a
2x4 across the top and nail the
plywood templates to either side
of the structure. (SEE FIG. 3)
[4] TRANSITION BRACING
AND SUPPORT
2x4's will be used to support
the plywood skating surface. Start
at the bottom of the transition by
placing a 2x4 between the
templates with the 2" side facing
out and flush with the plywood
forms Work up through the bottom
of the transition, placing a 2x4
every 6 inches and secure with
two nails on either side. A 2×4
every 12 inches in the upper and
vertical sections of the ramp will
provide enough strength and
support in those areas. (SEE PHOTOS
1&2)
[5] PLYWOOD APPLICATION
Again, start at the bottom and
work up. Centor a full sheet in the
middle of the flat bottom section
and secure with a nail in each
corner. Using nails sparingly at this
point is important because if you
Fig 1)
Fig 2
SCRAP
4-8-34°
PLYWOOD
have to take up the plywood for
any reason it will be much easier.
Also, wood screws are recom-
mended for attaching the plywood
because screws will not pull out as
easily as nails. When applying the
plywood to the transitions have a
couple of people stand on the
wood to help bend it into a tight
fit and secure with enough nails to
hold it down until you can go
back with screws Fo4
The thickness of the plywood
you use may depend on availabil
thick is easy to bend
y
although two layers are recom-
mended for strength. If you will be
using thicker stock it is a good
idea to cut parallel lines, about
half the thickness of the wood, on
the underside of the sheet to
facilitate bending
Photo 1
[6] ADDITIONS AND
ACCESSORIES
The key to a shreddable ramp
lies not only in the transitions but
also the coping or lip that you use.
There are many materials that can
be used for coping (broomstick
2x4, PVC pipe, and metal pipe)
whatever you use is up to you
But it is a good idea to put some
kind of edge on your ramp.
Another feature that will
Improve
your ramp is a rollout deck on
either side. By simply adding to
the framework of the ramp you
can build 2-4 foot wide platforms
at the top of each wall. They may
be used for roll outs, drop ins and
other deck tricks, and also add
strength to the ramp.
d
Fig. 3)
FG4
Photo 21
[7] PAINTING
Now that you've completed the
basic structure you may want to
session on it for a few days to
make sure everything came
together properly. But before too
long you should think about paint-
ing the ramp to preserve the
wood and prevent cracking due
to weather.
Your basic enamel (water base)
exterior paint works best because
it soaks in and dries fast. You should
apply two thin coats rather than
one thick coat, letting the first one
dry before applying the second.
This will prevent the surface from
becoming slippery.
Now you are ready to conduct
full-on sessions on your very own
skate structure. Remember, this
article is just a general guideline
to constructing a ramp. Any
resourceful person can easily find
ways to cut costs and save time,
but hopefully this will give you an
idea of what's involved in building
a sizable skate ramp.
Mike Folmer
23